Deploying a Zola static site with Azure Static Web Apps
Matt 5 min read 863 words July 06, 2025 #Azure #GitHub #DeploymentAs you may have noticed from the footer, this website is built with Zola, my preferred static site generator.
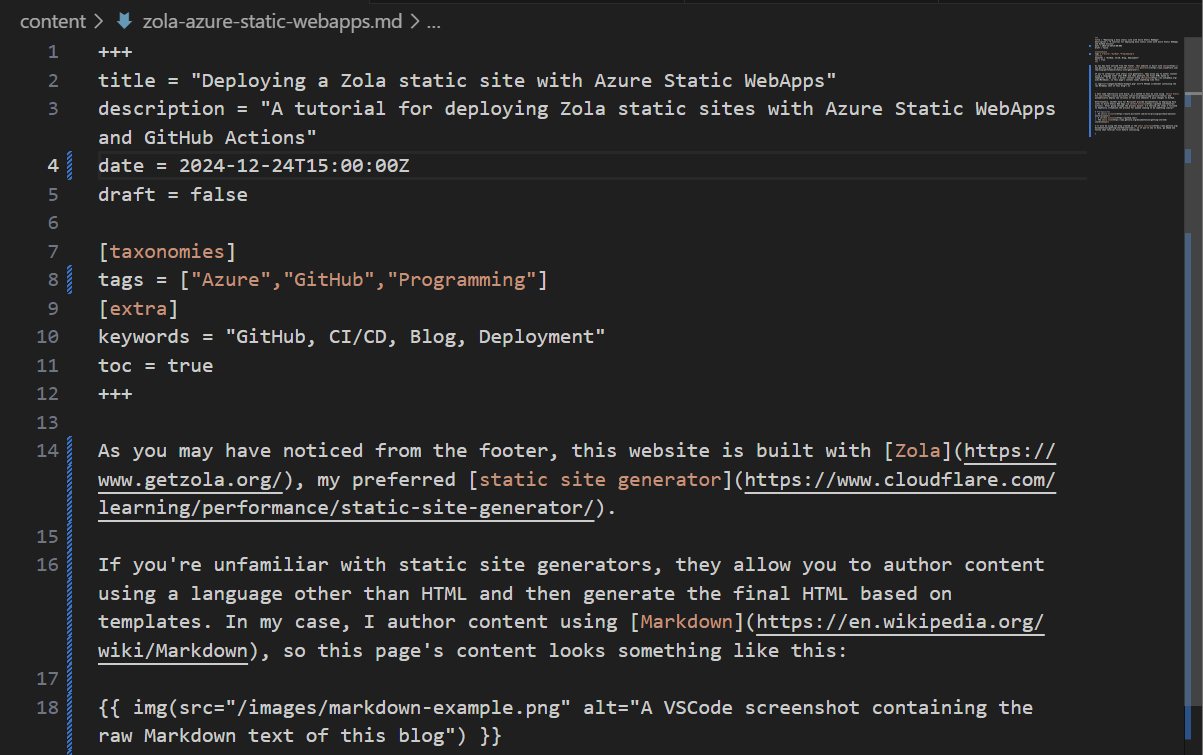
If you're unfamiliar with static site generators, they allow you to author content using a language other than HTML and then generate the final HTML based on templates. In my case, I author content using Markdown, so this page's content looks something like this:
I have some familiarity with Azure, so I wanted to host my site using Azure Static Web Apps and automatically deploy new versions of the site whenever I push changes to GitHub.
Unfortunately, neither Zola nor Microsoft provide documentation on deploying Zola sites to Azure Static Web Apps via GitHub Actions. After going through the process myself, I'm sharing the steps I followed to hopefully streamline the process for anyone looking to do the same!
Prerequisites
- An Azure account
- A GitHub account
- The Zola CLI
I'll also be using the blog created in the Zola tutorial, so if you're new to Zola, go ahead and follow that tutorial first and get the tutorial site building locally before continuing.
Deploying your site
Setting up your repository
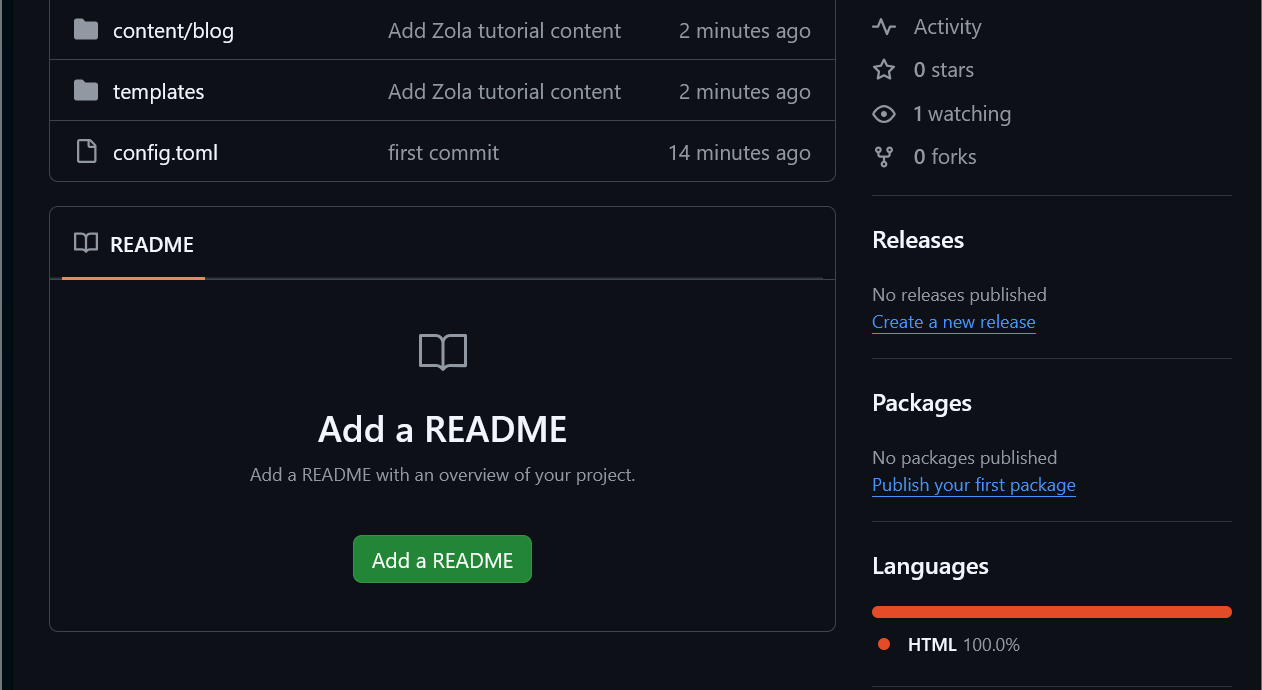
In order to deploy the site, you'll want to create a new GitHub repository. Follow the instructions on the creation page and make sure not to check the Add a README file checkbox. Once created, you'll be greeted with an empty repository.
In the directory where you created the sample blog from the Zola tutorial, follow the instructions from the ..or create a new repository on the command line guidance that appears in your empty repository page. After running those commands, your GitHub repository should look like:
Configuring Azure Static Web Apps
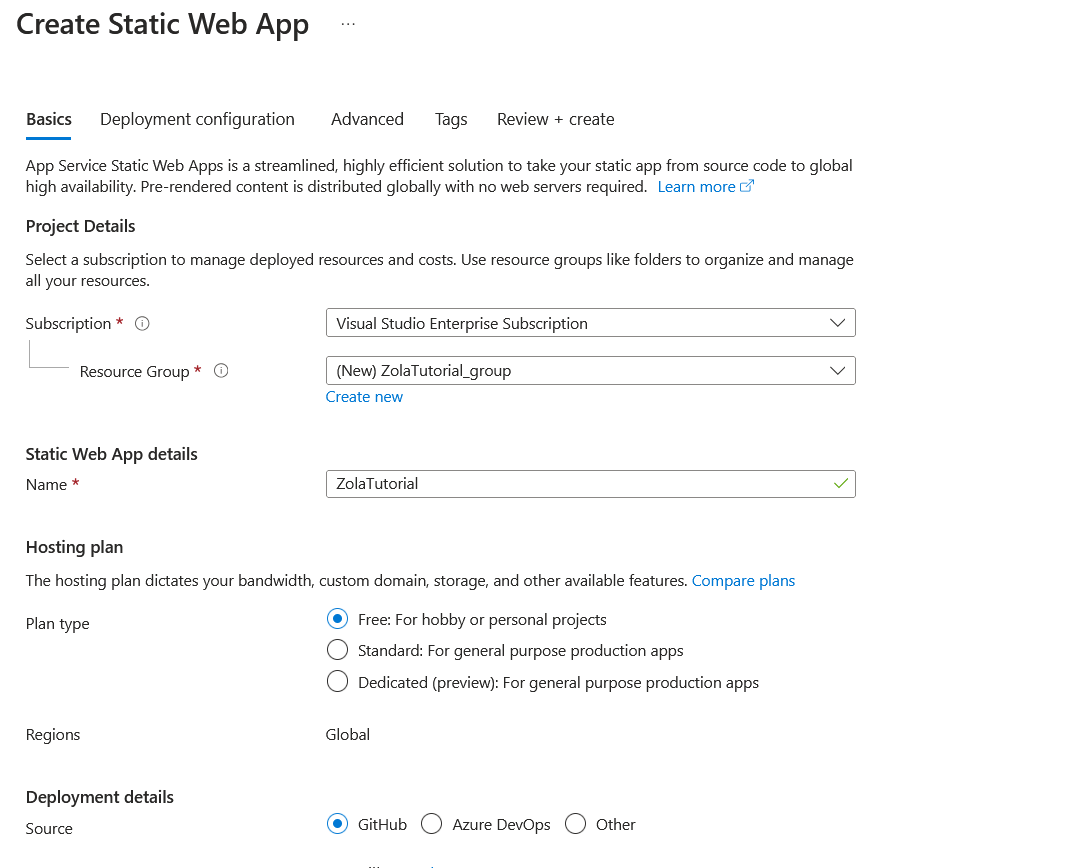
In the Azure Portal, search for Static Web Apps and create a new Static Web App resource in your subscription.
Keep the default setting for creating the Resource Group and give your Static Web App a name. Select the free hosting plan and select GitHub as the Deployment source. Azure will pop up a new window for authenticating with GitHub. Once you've logged in, find the repository you just created in the drop down and select your desired default branch.
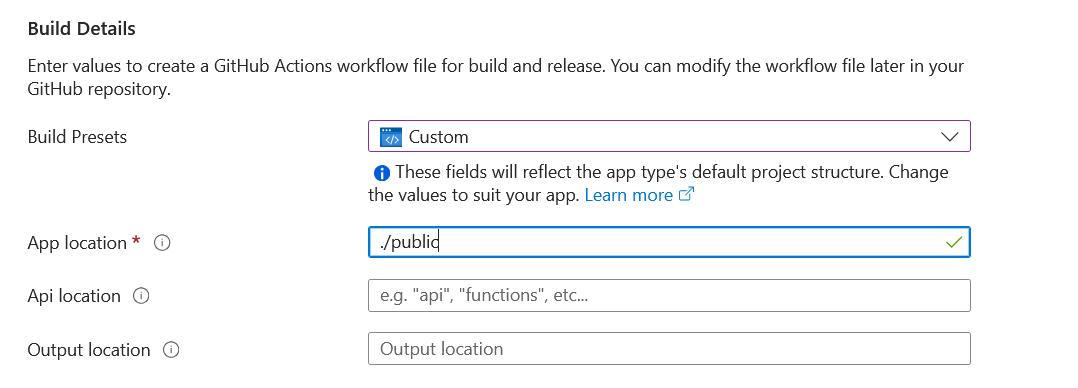
Select the Custom build preset and set ./public as the app location. This is the default location that the zola build command will output the generated HTML and assets to. Leave Api location and Output location blank.
Click Review+Create, and then click Create. Azure will redirect you to a deployment overview page and notify you when the deployment is complete.
Go to the overview page for your Static Web App and make note of the URL that Azure has automatically generated for your web app.
Updating the GitHub Workflow
Back in your GitHub repository, Azure will have created a GitHub actions workflow YAML file in the .github/workflows directory.
In the Actions tab of your GitHub repository, you'll see the inclusion of this file also automatically kicked off a workflow run. This run will have failed since we haven't configured Zola to build the site in the workflow yet. Let's fix that now!
We'll be using the install-action GitHub Action for installing Zola onto your build agent.
In your local Git repository, pull down the latest changes from the GitHub repository that were added by the Static Web Apps deployment.
Add the following snippet after the actions/checkout action in your workflow yaml file:
- uses: taiki-e/install-action@v2
  with:
    tool: zola@0.19.1
Afterwards, add the following action to run the zola build command during the workflow:
- name: Build Static Site
  run: zola build
Your workflow file should now look like:
# .github/workflows/azure-static-web-apps-<web-app-name>
name: Azure Static Web Apps CI/CD
on:
push:
branches:
- main
pull_request:
types:
branches:
- main
jobs:
build_and_deploy_job:
if: github.event_name == 'push' || (github.event_name == 'pull_request' && github.event.action != 'closed')
runs-on: ubuntu-latest
name: Build and Deploy Job
steps:
- uses: actions/checkout@v3
with:
submodules: true
lfs: false
- uses: taiki-e/install-action@v2
with:
tool: zola@0.19.1
- name: Build Static Site
run: zola build
- name: Build And Deploy
id: builddeploy
uses: Azure/static-web-apps-deploy@v1
with:
azure_static_web_apps_api_token: ${{ secrets.AZURE_STATIC_WEB_APPS_API_TOKEN_<WEB_APP_NAME>}}
repo_token: ${{ secrets.GITHUB_TOKEN }} # Used for Github integrations (i.e. PR comments)
action: "upload"
###### Repository/Build Configurations - These values can be configured to match your app requirements. ######
# For more information regarding Static Web App workflow configurations, please visit: https://aka.ms/swaworkflowconfig
app_location: "./public" # App source code path
api_location: "" # Api source code path - optional
output_location: "" # Built app content directory - optional
###### End of Repository/Build Configurations ######
close_pull_request_job:
if: github.event_name == 'pull_request' && github.event.action == 'closed'
runs-on: ubuntu-latest
name: Close Pull Request Job
steps:
- name: Close Pull Request
id: closepullrequest
uses: Azure/static-web-apps-deploy@v1
with:
azure_static_web_apps_api_token: ${{ secrets.AZURE_STATIC_WEB_APPS_API_TOKEN<WEB_APP_NAME> }}
action: "close"
There's one last change to make before pushing your updates. In your config.toml file, edit the base_url with the URL you noted from earlier that Azure automatically generated for your web app.
Wrapping up
Pushing the changes to your GitHub repository will kick off a new workflow run that will build and deploy your site.
Navigate to your web app's URL and you should now see your deployed site!
Hopefully this served as a good starting point for setting up automatic deployments of your Zola blog from GitHub Actions. There's plenty of things you can do from here, like configuring Azure Static Web Apps to use a custom domain or setting up Zola to use a theme.
Comments via 🦋 Bluesky